When I was a young girl, my paternal great grandmother made me this quilt. When I was at her house, I noticed her sewing in the evening while watching television. It was done completely by hand. It never occurred to me that she was sewing it for me.
At the age of fifty, I still have the quilt and I treasure it. At some point, she made me a second one, and my maternal grandmother, who was a professional seamstress made me a third. I should probably pass them down to my children, but I can’t bear to part with them.
I have long been an artist. I make music professionally. I write novels professionally. I’ve made all of the artwork in my home, from paintings to rugs to throw pillows. Well, I was bored and decided to take on the time-consuming project of making a quilt. What was I thinking??
 It started with cutting out 680 pieces. Sigh. That took a couple weeks. Then, fortunately, I had house guests, so I put it all in a box and ignored it for a couple weeks.
 When I pulled it back out, I began making pinwheels for the center of the blocks. Twenty pinwheels seemed daunting, but using a sewing machine, (not sewing by hand, you silly rabbit!) the pieces came together fairly quickly, but still….there was twenty of them.
 Now, I had to cut these square pinwheels and turn them into octagons. Not owning a special ruler or being able to find one at JoAnn Fabrics, I spent hours figuring out how to do this. After I had a total meltdown, my husband quietly worked on the computer constructing a template for me. In the meantime, I found a video on Youtube showing an easy way to turn a square into an octagon. When I cut one in two seconds and showed him, he was awestruck by the simplicity. “Well, if you want to do it like that,” he said sarcastically.
The original pinwheels were 7” squares, and after I turned them into octagons, I needed to sew corners on them, making them 6.5” squares. At the time, I was thinking this was some kind of cruel joke, but as the pinwheel got new corners, it began to change shape. It looked like a cross. Weird illusion.
 Next, I started working on the star points. They were time consuming, but they came together easily. The octagon/square was placed in the middle of the star points. Notice in this photo, the octagon still looks like a cross, and the completed square has two star points pointing up. Well, that’s also an illusion and won’t look like that for long.
I was supposed to cut these completed squares into large circles, but as with cutting octagons, that was just too much work. So instead, I sewed together frames, sewed them onto the completed squares, lining up the seams with each star point and creating a whole new angle on the original square. I flipped it over and trimmed off the excess corners on the square. That was so much quicker than trying to cut a perfect circle, hoping I didn’t cut it too small. From the wrong side of the quilt, it’s pretty sloppy, but from the right side, you can’t tell, and it saved me tons of time and probably a half bottle of whiskey.
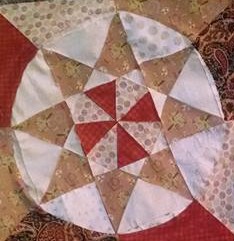 Since the octagon and the star points shifted with adding the frame, you can see in the finished square that the cross is gone and the star only has one point sticking up. This whole quilt is one big illusion.
1910 seams later, the quilt top is finished. I need to sandwich it and start quilting. But I think I need to take a break for a couple weeks first.

Won’t it be fun if my great grandchild won’t part with this quilt?
 As if I don’t have enough to do between working a day job, playing music on the weekends, and writing novels, I’ve decided to open an Etsy Shop. I’ve created all of the artwork in every house I’ve owned for years and years. I’ve painted, quilted, tiled, and carved my way through a half dozen houses in two states. I enjoy doing it, but I’ve run out of space in my house, unless I want to change from Country Chic to something else. My trophy husband might kill me. We bought our current house Dec 2016 and I’ve already remodeled the kitchen twice. It’s not my fault. I didn’t like it the first time.


 If you haven’t noticed, I pretty much took the entire year off from blogging and writing in 2017. I moved into a new home December 2016 and spent the year working on the house and getting the garden going.


 The tree is about a foot wide at the bottom, so I started with a big, fat paint brush and some really scary black paint. I aimed for the middle of the wall, fighting with the corner of my desk that was too heavy for me to move. Next, I grabbed the next size smaller brush and started painting random branches. This is the point where my trophy husband came home from work, walked into the office, stared at the wall for a minute, shook his head, and walked out. Yeah, I know it doesn’t look that great, but just wait! I’m an artist. You have to trust me. Then again, he’s been here before. Poor guy.
 Step two. I used a smaller paint brush to extend the branches and then another smaller one. Starting to look like a tree, no? A little skimpy, but still, a tree! It’s going to need to be a lot bigger than this for all my pictures. I’m thinking of taking it all the way to the ceiling and as wide as it’ll go.
 Step three. I used even smaller brushes. The tree’s getting bigger. Of course I’m climbing across my desk and standing on a chair to reach this high, so I have to keep getting down and backing up to make sure it’s symmetrical. I don’t want it perfect, but I do want it to at least look like a healthy tree. My knees may be getting a little tired. Trophy husband’s also asking about dinner. Umm, I’m in the middle, you’ll have to order a pizza. Poor guy. But in my defense, he already knew we were having pizza when he came home and saw the beginning of the tree.
 Step four is a smaller brush and a smaller brush. Need. More. Branches. My arm is getting tired now.
 Step five is the smallest brush I could find, like one of those out of a paint-by-number box. I’m not sure the branches go as small as I want, but my next step would be to use a Sharpie. I don’t think trophy husband would approve, and I’m not sure you can re-paint over a Sharpie. Sounds like that might be a problem if this thing doesn’t turn out.
 Step six. The next day, I randomly taped pictures to the wall to figure out how I wanted to display the photos I have. It’s kind of looking cool just doing it randomly.
 Step seven. After living with it for a couple days, I decided to stay random. I also decided to not frame anything. I like the freedom to add and move the pictures as needed. I used two rolls of cellophane tape.